Saturday, September 15, 2012

White Lasagna Casserole

So I've been seeing alot of recipes lately that are pasta dishes with white sauces. I found a super simple and quick weeknight dish that mimics lasagna, but slightly different. I really enjoyed this dish and would totally make it again.

If you are looking for something quick and tasty, this is it. It was ready in 45 min and total prep time was 15min. So on those nights when you really don't have time, this is the meal you should make. Throw together a salad while it is cooking and you are set! Enjoy!

Recipe adapted from http://www.navywifecook.com/2012/08/baked-spasanga.html.

White Lasagna Casserole

Ingredients
egg noodles, cooked (16 oz)
shredded mozzarella cheese (8oz)
8 oz ricotta cheese
6oz sour cream
3/4 cup half-and-half
1/2 cup grated parmesan cheese, divided
1 teaspoon oregano
1 teaspoon basil
1/2 teaspoon pepper
1 teaspoon minced garlic
1 teaspoon salt
1 jar spaghetti sauce (24 oz), or your favorite tomato sauce
1 lb ground beef (Optional)


Directions

1. Heat oven to 350 degrees. Cook noodles according to package directions, drain.
2. In medium bowl, stir together sour cream, ricotta, half-and-half, mozzarella, oregano, basil, pepper, garlic, salt, and half the Parmesan cheese. Add noodles and toss until well coated.
3. Pour noodle mixture into a greased 9x13 pan. Top noodles with remaining Parmesan cheese. Cover dish and bake 25 minutes. Remove cover and cook an additional 5 minutes.
4. While pasta is baking, prepare meat sauce. Brown ground beef/meat in large skillet. Drain. Add spaghetti sauce and simmer.
5. Remove pasta from oven. Cut into squares and top with sauce.

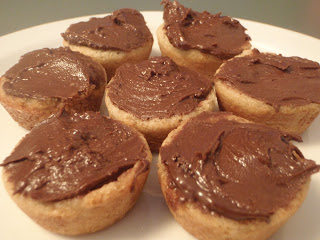
Nutella Cookie Cups

Well it is the weekend and I have no sweets in my house. I am always seeing recipes that include Nutella and I thought I'd try one of them. I picked one that is easy and quick. I like them. There is something about the cookie part that reminds me of another food and I cannot place what it is. If you try this recipe and figure it out, let me know. I hope you enjoy!!!
 
 
NUTELLA COOKIE CUPS
 
 
Ingredients:
(Cookie cups)
  • 1 stick butter (softened)
  • 1/2 cup white sugar
  • 1/4 cup packed brown sugar
  • 1 egg
  • 1/2 tbsp vanilla extract
  • 1 1/2 cups all-purpose flour
  • 1/2 teaspoon baking soda
  • 1/2 teaspoon salt
  • Sliced strawberries, raspberries, or other fruit (optional)
(Buttercream)
  • 1/3 cup Nutella
  • 1 cup powdered sugar
  • 1/2 stick butter, softened
Directions:
  1. Preheat oven to 350 degrees. Grease a mini muffin tin.
  2. In a large bowl, cream together butter and sugars until light and fluffy.
  3. Add eggs and vanilla and stir until fully incorporated.
  4. Add dry ingredients and mix well.
  5. Allow dough to chill for 30 minutes, then roll it into 1.5-2 inch balls.
  6. Drop balls of dough into each cup of the mini muffin tin and bake for 10 minutes, or until golden brown.

  1. Remove cookies from the oven and immediately press into the poofy centers of each cookie with the bottom of a shot glass, creating a cup/well. Allow cookie cups to sit for 5 minutes, then pop them out of the tin and onto cooling racks.


  1. In a medium bowl, cream together 1 stick butter, powdered sugar, and Nutella. Add more Nutella based on taste, if desired.
  2. Spoon Nutella buttercream into the center of each cookie.
    ** The dough makes over 3 dozen cookies, and the frosting should be enough for at least 2 dozen…I deliberately made less frosting than I would need, b/c I really wanted an excuse to spoon straight Nutella into some of the cups…
  3. Gently press a slice of strawberry, a raspberry, or any other fruit into the frosting of each cup.
  4. Enjoy immediately!

Maple Oat Scones

Today was a lovely Sunday filled with hiking, taking care of my sick puppy and baking/cooking. First my poor little Basset, Dozer, was sick this AM. I figured it was nothing as dogs on occasion will get sick. I took him for a hike up Red Butte and he got sick again. He hardly had his normal energy. What a bad parent I am. We took it slow on the way down though. Once we got home I was ready to bake and he was ready to sleep.

 As a wedding gift from my coworkers they all pitched in and gave me a KitchenAid mixer. I am loving it. I have never done so much baking.

One of my projects today was Maple Oat Scones. These were surprisingly easy. They had the perfect amount of crispy outside to soft and moist inside. Thanks to food networks Ina Garten for this super easy and quick recipe. Enjoy!


INGREDIENTS
Scones
  • 1 3/4 cups all-purpose flour
  • 1/2 cup whole-wheat flour
  • 1/2 cup quick-cooking oats (or old-fashioned oats)
  • 1 tbsp. baking powder
  • 3 tbsp. light brown sugar (not packed)
  • 1 tsp. salt
  • 1/2 tsp. cinnamon
  • 1/2 lb. (2 sticks) unsalted butter–cold and diced
  • 1/4 cup cold buttermilk
  • 1/4 cup pure maple syrup
  • 2 extra-large eggs, lightly beaten
  • 1/4 tsp. vanilla extract
  • 1/4 tsp. maple extract
  • 1 egg beaten with 1 tbsp. milk or water, for egg wash
Glaze
  • 1 1/4 cups powdered sugar
  • 1/2 cup pure maple syrup
  • 1 tsp. pure vanilla extract
DIRECTIONS
* Preheat oven to 400 degrees F.
* In the bowl of an electric mixer fitted with the paddle attachment, combine the flours, oats, baking powder, sugar, cinnamon and salt.
* Blend in the cold butter at the lowest speed and mix until the butter is in pea-sized pieces.
*Combine the buttermilk, maple syrup, and eggs and add quickly to the flour mixture. Mix until just blended. The dough may be sticky.

*Dump the dough onto a well-floured surface and be sure it is combined. Flour your hands and pat the dough into a circle until it is about 3/4-inch or 1-inch thick. You should see lumps of butter in the dough. Cut the circle of dough into 8 wedges and place on a baking sheet lined with parchment paper or a silicone mat.

* Brush the tops of the scones with egg wash.

* Bake for 20-25 minutes, until the tops are crisp and the insides are done. Remove from oven and cool for 5 minutes before drizzling with glaze.
* Combine the glaze ingredients. Drizzle onto scones. While glaze is still wet, sprinkle a bit of oats onto the tops for garnish.

Easy Dinner Rolls

Another Sunday project. . . Dinner Rolls. Stuart's Mom, Carolynn, is known for making delicious bread and in particular her rolls. I have yet to be able to watch and learn from her. One of these days we will have to do that as I want to be able to make my husband his favorites rolls. It will take me plenty of practice and I am ready to get started.

In attempt to make Carolynn's rolls, I found a simple recipe for dinner rolls. If what you are looking for is simple, then this is it. They tasted great with butter and homemade strawberry jam. To make savory rolls add some black pepper, garlic, and rosemary to the dough at the same time you add the salt. Enjoy!


Recipe adapted from http://tideandthyme.com/rosemary-black-pepper-dinner-rolls/.

Ingredients:
1 package (2 1/4 tsp) yeast
1 cup lukewarm water
2 tablespoon oil (vegetable, canola, or olive) plus more for greasing bowl
1 large egg
3 tablespoons sugar
3 1/4 cups flour
1 teaspoon salt
2 tablespoons melted butter

Add the water to the bowl of a stand mixer fitted with the dough hook and sprinkle the yeast over the top. Allow to sit for 10 minutes until the yeast becomes frothy. Add the oil, egg, sugar, to the bowl. Add the flour and mix on medium-low speed for about 2 minutes, just until the dough comes together. If the dough doesn’t clear the sides of the bowl, continue adding flour 1 tablespoon at a time.
Increase speed to medium and knead the dough for 5 minutes. Cover the bowl with a damp towel and allow to rest for 20 minutes. Add the salt and mix on low speed for an additional minute. Transfer the dough to a large, lightly greased bowl. Cover with a damp towel and let rise in a warm place until doubled in bulk, 1 to 1 1/2 hours.
Grease the bottom and sides of 2 8-inch baking pans. Turn the dough onto a lightly floured surface and divide in half. Equally divide each half into 7 pieces about the size of a golf ball (2 ounces each if you’re weighing). Gently roll into rounds and place in the pans, leaving about half an inch of space between them. If freezing, wrap pan tightly in foil and place in freezer. Thaw and rise for 2 to 2 1/2 hours the day of baking and continue. Cover rolls and allow to rise for at least 20 minutes, or until they’ve expanded to fill the pan.
Preheat oven to 350ยบ. Brush with each pan with half of the melted butter and bake for 20 to 30 minutes, until golden brown. Serve immediately or at room temperature.

Sunday, July 29, 2012

Fondue for Three

So I told the "Fam" we were going to have a romantic dinner. So it was decided we would have fondue by candlelight. Sarah had never had fondue and Stuart told her, "Sarah, you haven't lived until you've had fondue."

We went the simple route and a cheese fondue and a chocolate fondue.

The first course was a simple salad:

Salad:

3 cups leafy greens
1/4 cup sliced red onion
1/2 tomato, small bit sized pieces
1/4 cup coarsely chopped pecans
1/3 cup crumbled blue cheese
Balsamic dressing
                                  
Directions:
 Mix all ingredients, except dressing. Allow each person to add desired amounts of

The second course was the cheese fondue. I say cut up whatever veggies you have on hand that sound good with cheese. We also cut up grilled elk London broil steak and kalamata olive bread. Just make sure everything is in bite size pieces.

Cheese Fondue:

6 oz. medium sharp cheddar cheese, cubed
2 oz. Emmenthaler Swiss cheese, cubed
4 oz. Coors Light beer
2 tsp. chopped garlic
2 tsp. Worcestershire sauce
2 tsp. dry mustard powder
2 Tbsp. flour
                                          
Directions:
     Set up a double boiler system. Heat Coors Light, garlic, Worcestershire sauce, and dry mustard. While that is heating up, mix cubed cheese and flour in a medium bowl. Once beer mix is hot, add cheese mixture 1/3 at time. Do not add more cheese until the first round is melted. Continue stirring as cheese melts. Place in fondue pot when you're ready to eat. Do not make ahead of time, reheating this recipe does not work well.
                                  
     Serve with your desired veggies, meat, or bread.
                                  

The third course, was dessert, chocolate fondue. Cut up your favorite fruit. We did strawberries, bananas, and mango. You can also dip, cake, marshmallows, rice crispy treats, etc. Be creative, it's fun!

Chocolate Fondue:

200grams semi sweet chocolate morsels
4 Tbsp. Whipping cream
1 1/2 Tbsp. Milk
                                     
Directions:
     Again, set up a double boiler system. Met chocolate chips. Then add cream and milk. Mix until completely combined and creamy. Place in a fondue pot. Serve with desired dippings.


Blueberry-Lemony Coffee Cake

And we're back in the game!!! It's been nearly 4 months since my last post. I've been a little preoccupied with wedding planning. I got married July 14th to a man I cannot live without. But, none the less I've still been cooking. This is the first one I have taken the time to blog about.

Sarah is here for the summer and wanted something with blueberries, so this is a new recipe I found. I hope you enjoy!!!! This recipe has been adapted from the sweet pea kitchen.

Blueberry-Lemony Coffee Cake
Ingredients:

For the Topping:
  • 1/3 cup packed light brown sugar
  • 1/3 cup granulated sugar
  • 1 tablespoon ground cinnamon
  • 1 tablespoon unsalted butter, melted and cooled
  • 1 cup walnuts, chopped coarse


  • For the Cake:
  • 3 cups all-purpose flour
  • 1 tablespoon baking powder
  • 1 teaspoon baking soda
  • 1 teaspoon ground cinnamon
  • 1/4 teaspoon table salt
  • 1 ¾ cups buttermilk
  • 1 cup packed light brown sugar
  • 1 cup granulated sugar (7 ounces)
  • 3 large eggs
  • 7 tablespoons unsalted butter, melted and cooled
  • 1 cup blueberries (fresh or frozen), rinsed and dried
  • 1 teaspoon grated lemon zest


  • For the Icing:
  • 1/2 cup confectioners sugar
  • 1/2 to 1 tablespoon fresh lemon juice


  • Directions:
    1. To make the topping: In a medium bowl, mix the brown sugar, granulated sugar, cinnamon, and melted butter together until the mixture resembles wet sand. Stir in the nuts; set aside.
    2. Preheat the oven to 350°. Grease a 9×13 inch square baking pan and set aside.
    3. To make the coffee cake: In a medium bowl, whisk together the flour, baking powder, baking soda, cinnamon, and salt; set aside.
    4. In a medium bowl, whisk together the buttermilk, brown sugar, granulated sugar, eggs, and melted butter until smooth. Gently fold the egg mixture into the flour mixture with a rubber spatula and stir until the batter looks smooth and well combined. Stir in blueberries and lemon zest.
    5. Pour mixture into prepared pan, spread into corners, and level surface with rubber spatula. Sprinkle the topping evenly over the batter. Bake until the top is golden and a toothpick inserted into the center comes out with just a few crumbs attached, 40 to 45 minutes. Let the cake cool on a wire rack for 15 minutes before serving.
                                        
         6. To make the lemon drizzle, in a small bowl, whisk together the confectioners’ sugar and ½      tablespoon of the lemon juice. The mixture should be thick but pourable. Add up to another ½ tablespoon of lemon juice if the mixture is too stiff. Drizzle over the top the coffee cake. Let harden, about 10 minutes, before serving.

    Saturday, March 17, 2012

    Irish Soda Bread

    Again, its St. Patty's Day and I'm baking bread. What better to make on St. Patrick's Day than the traditional Irish Soda Bread. I've never made this before. I had it recently in New Frontiers as a sample and I didn't care for it. I went searching for recipes and turns out there are a variety of Irish Soda Breads. I went with a relatively simple recipe. I like it. The bread is nothing outstanding, but it is a nice. Recipe from www.gimmesomeoven.com


    Recipe: Irish Soda Bread
    Ingredients:
    2 cups flour
    2 Tbsp sugar
    1 tsp baking powder
    1 tsp baking soda
    1/2 tsp salt
    3 Tbsp. butter
    1/2 cup raisins or dried currants (I used raisins)
    3/4 cup buttermilk

    Preheat oven to 375 degrees F. Grease a small cookie sheet.

    In a large bowl, mix flour, sugar, baking powder, baking soda, and salt. Cut in butter with a fork, or use your hands, until it resembles coarse crumbs.

    Stir in raisins and buttermilk until the dough is evenly moistened.

    Turn dough out onto a lightly floured surface. Knead gently until smooth.

    Shape into a 6" ball, place on a cookie sheet.

    With a sharp knife, cut a 1/4" deep cross on the top of the dough.

    Bake 30-40 minutes, or until the dough is just cooked through and the top is golden brown.


    Banana Nut Bread

    Today is St. Patrick's Day. It is windy as all get out outside, so I am staying in. I decided to bake bread today. First on the menu is Banana Nut Bread.

    I have always loved banana bread and what a great comfort food it can be. I hope you enjoy this recipe and feel free to add whatever you desire to spice it up such as chocolate chips, raisins, etc.


    Recipe: Banana Nut Bread


    Ingredients:
    1 cup sugar
    1 stick butter, softened
    2 cups all purpose flour
    1 tsp baking soda
    2 eggs, beaten
    1 tsp vanilla
    2 extra ripe regular sized bananas, or 3 small bananas, mashed
    1/2 cup nuts, chopped (i used walnuts)

    Preheat oven to 350 degrees F. Grease a loaf pan. I used 4 mini loaf pans. Set aside.

    Cream butter and sugar together until smooth.

    Add eggs one at a time.

    Add flour, baking soda, and mix until just blended.

    Then add mashed bananas and vanilla. Mix until just combined.

    Fold in nuts or other ingredients of your choice.

    Pour into loaf pan and sprinkle loaf (s) with sugar.

    Bake for 45 min if using regular sized loaf pan or 30 min if using mini loaf pans. Toothpick inserted should come out clean.

    Enjoy!!


    Sunday, March 11, 2012

    Chile Rellenos Casserole

    I love fresh Hatch chiles, or at least frozen and once fresh Hatch green chiles. I had a bag in the freezer and thought this Chile Rellenos Casserole recipe would be a good use for my Hatch chiles. Turns out it was.

    This dish reminds me of Dorothy Culliton's "John Wayne Eggs". It was a speciality breakfast she would make on occasion and was loved by all. Thanks for the inspiration Dorothy!

    This recipe was adapted from www.winnerdinners.com. I will say I reduced the amount of cheese in this dish by half or so. The original calls for 2 lbs of cheese, that is alot. So feel free to load up on cheese or not.

    Recipe: Chile Rellenos Casserole

    Ingredients:
    8 green chiles, skinned and deseeded (fresh or canned)
    1 lb. (16 oz.) Mexican blend shredded cheese ( or you can use 1/2 lb Cheddar and 1/2 lb Monterrey jack)
    4 eggs
    1 12 oz. can evaporated milk
    3 Tbsp flour
    1 tsp salt
    1 6 oz. can tomato paste
    1/3 lb ground elk
    1/2 tsp garlic powder
    1/4 tsp cumin
    pepper to taste

    Wash and rinse chiles and remove all seeds. Set aside.

    Cook ground elk or meat of your choice (you can also leave the meat out too) over medium heat. Add garlic powder, cumin, and pepper to taste. Set aside.

    Preheat oven to 300 degrees F.

    Layer 4 green chiles on the bottom of a 8"x8" baking dish or similar sized casserole dish. Sprinkle ~1/2 of the cheese blend over the chiles (reserve about 1/4 cup to sprinkle on top). Sprinkle cooked meat on top of the cheese.

    Layer the next 4 green chiles over the meat. Sprinkle with ~1/2 cheese blended on top of meat (still reserving bout 1/4 cup for top). Set aside.

    Separate eggs into 2 medium bowls.

    Beat egg yolks for a couple minutes until light and bubbly. Add milk, flour, and salt. Beat for 1 more minute.

    Beat egg whites for 1 minute. Add egg yolk and milk mixture to the whites. Beat until combined, 30 seconds.

    Pour egg mixture over cheese and chiles in the casserole dish.

    Bake for 1 hour at 300 degrees uncovered.

    Remove from oven and spread tomato paste over top of casserole. Sprinkle with remaining cheese. Cook for an additional 30 minutes at 300 degrees F.

    Remove from oven and allow to cool for 5-10 minutes. Serve with rice and beans or eat on its own. Delicious! Enjoy!


    Saturday, March 10, 2012

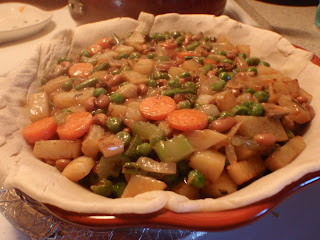
    Vegan Veggie Pot Pie

    This recipe or dish used to be one of my fallback dishes when I was vegan. When I didn't know what to cook I'd go with this staple dish. It's really easy to make and it's too time consuming.


    Recipe: Vegan Veggie Pot Pie

    Ingredients:
    2 sheets pie crust (homemade or store bought)
    1 Tbsp Olive Oil
    2-3 medium carrots, chopped
    1/2 cup onion, sliced
    1/2 cup asparagus, chopped
    1 bakers potato, chopped
    2-3 stalks celery, chopped
    3/4 cup mushrooms, chopped
    1/2 cup frozen peas
    1/2 can (14.5 oz) blackeyed peas
    1 tsp cumin
    2 cloves garlic, minced
    1 tsp black pepper
    3/4 tsp onion powder
    1/2 tsp chili powder


    For Sauce:
    1/4 cup flour
    2 cups soy milk
    1 Tbsp olive oil
    1 Tbsp soy sauce
    1 tsp Cumin
    1 tsp garlic salt
    pepper to taste
    1/4-1/2 cup nutritional yeast

    Preheat oven to 375 degrees F.

    Place one sheet of pie crust into a pie baking dish. Bake for 8 minutes until slightly cooked. Remove from oven and set aside.

    Pour 1 Tbsp oil into a medium skillet. Place carrots, potato and asparagus into skillet. Cook for 5-10 minutes until slightly tender. Add celery, onion, mushrooms and garlic. Cook until veggies are tender 10-15 minutes. Add peas and blackeyed peas, cook an additional 3-5 minutes until heated through. Add Spices and mix.

    While ingredients are cooking in skillet or after, make sauce.

    Pour 1 Tbsp Olive oil into a saucepan. Heat over medium. When warm, add flour. Stir.

    Add 1/2 cup soymilk to saucepan, mix with flour. Continue to add 1/2 cup soymilk at a time until you have added 2 cups. Based on the desired thickness of your sauce you can add more soymilk if you wish.

    Add soy sauce and nutritional yeast, mix. Taste and add more spices if desired. The sauce should have a somewhat strong flavor.

    Pour sauce into skillet with vegetables, mix. Pour mixture into pie crust that is partially baked. Top with other pie crust. Pinch edges of crusts together. Place 4-5 slices in top of crust to allow venting.

    Bake until golden brown, about 35-45 minutes. (Tip: cover edges of pie with foil to avoid over browning. Remove 5-10 minutes before pie is finished baking.)

    Remove from oven and cool for 10 minutes. Enjoy!


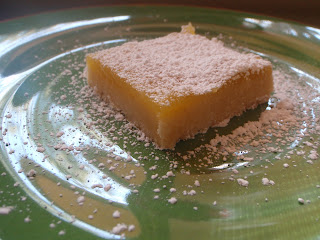
    Clementine Curd Shortbread Bars

    So I apologize to the many who like my blog posts. I felt the wrath the other night from everyone. (I'm just joking, only one person mentioned something to me, PETE!) Thanks to Pete mentioning something I decided to jump back on the wagon and begin my back log of posts.
    I have been cooking and baking since my last post, but haven't been blogging about it. I'm starting again.

    Yesterday Dozer, my dog, woke me up at 4:50am. He was barking and howling, which is not normal for him. I think it may have been the coyote in the neighborhood that I heard howling earlier. Dozer's response was just a little delayed. None the less, I woke up earlier than I wanted. So, what do I do? I made shortbread bars. I had some clementine curd I made the other week that I really wasn't using. I figured this would be a great use of the curd before it goes bad.

    Curd takes a little time to make, but it is quite tasty. So if you have the 30 minutes or so that it takes to make it, do it.


    Recipe: Clementine Curd Shortbread Bars


    Ingredients:

    For Curd:
    6 Tbsp of unsalted butter, at room temperature
    1 cup sugar
    2 large eggs
    2 large egg yolks
    2/3 cup fresh clementine juice
    1 tsp grated clementine zest


    For Shortbread:
    1 3/4 cups plus 2 Tbsp Flour
    3/4 cup powdered sugar, plus extra for sprinkling
    3/4 tsp salt
    3/4 cup (1 1/2 sticks) unsalted butter, softened


    Make curd first. I suggest a day ahead or night ahead of time.


    For Curd: 


    Cream butter and sugar together in a large bowl for about 2 minutes or until light, pale, and fluffy. While mixing, slowly add eggs and yolks. Beat the mixture for 1 minute before mixing in the clementine juice. Don’t worry if the mixture looks curdled, because it’ll get smooth as it cooks and the butter melts.

    Cook the mixture in a heavy saucepan over medium heat, stirring constantly, for about 20-25 minutes (lemon curd only takes 15, but I’ve found the clementine curd takes me longer), or until it’s thickening and it registers at least 170 degrees on a candy thermometer (I usually end up around 175 before I get it to the thickness I want). Just don’t let the mixture boil. Also, remember it’ll continue thickening as it cools and then chills, so don’t feel like you have to get it to its final thickness on the stove. When it’s done, it should leave a clean path on the back of a wooden spoon when you run your finger down it.

    Remove the clementine curd from the heat and stir in the clementine zest. Transfer the mixture to a wide bowl and place a layer of plastic wrap directly on the surface of the curd to prevent a film from developing. Place the curd in the refrigerate to chill it. Cover it tightly and keep if you about a week in the fridge or for about 2 months in the freezer.


    For Shortbread Bars:


    Line a 9×12 inch baking pan with parchment paper, leaving extra overhanging short edges to use to remove the bars after baking. 


    Mix the flour, powdered sugar, and salt until just combined. Add the butter and cut in until blended.


    Pour the mixture onto the parchment-lined baking pan and spread evenly. Use hands to press crust firmly down. Refrigerate for 30 minutes.


    Preheat oven to 350 degrees F. Bake the crust for 15-20 minutes, until light golden brown.


    While it is still warm, pour the chilled clementine curd over the top and use a spatula to spread it evenly.


    Bake for an additional 10 minutes, until the curd is set.


    When cooled, use the parchment paper to pull the bars out of the pan. Use a flour sifter to sprinkle the top with powdered sugar, and cut into squares.


    Enjoy!


    Sunday, February 12, 2012

    Homemade Valentine's Day Oreos

    I wanted to make a Valentine's Day treat, but all the recipes out there include a heart shape cutter and I don't have one. Instead of making something in the shape of a heart I made homemade Oreos with pink filling. This recipe was adapted from smittenkitchen.com

    Recipe: Homemade Valentine's Day Oreos
    Ingredients:
    1 1/4 cup flour
    1/2 cup cocoa powder
    1 tsp baking soda
    1/4 tsp baking powder
    1/4 tsp salt
    1 1/2 cups sugar
    10 Tbsp. Butter at room temperature
    1 large egg

    Filling:
    2 Tbsp. butter at room temperature
    1/4 cup cream cheese at room temperature
    2 cups powdered sugar
    2 tsp vanilla extract
    20 drops red food coloring

    Preheat over to 375 degrees F.

    In a medium bowl mix flour, cocoa powder, baking soda, baking powder, salt, and sugar. (It you want to make  chocolate and white cookies, cut the recipe in half for each flavor. Do not add cocoa to the white cookie mixture, but do add an extra 1/4 cup flour to it. Also cut the cocoa for the chocolate cookies to 1/4 cup cocoa.)

    Add butter and egg to the dry mix (mixes) until well blended.

    Drop tsp sized balls onto parchment lined cookie sheets. Place 2 inches apart from one another.

    Bake for 8-9 minutes. Remove from oven and allow to cool on cookie sheet for 2 minutes. Remove to wire rack to finish cooling.

    To make cream cheese filling mix cream cheese and butter. Add vanilla and food coloring, mix. Add powdered sugar and mix until blended.

    Once cookies have cooled spread layer of filling onto one cookie and top with another cookie.


    Mini Football Pizza Pockets

    This is what I made for Superbowl Sunday. I think it was enjoyed by others because by halftime they were gone. I will caution these do take a bit of prep, but the product is rewarding.


    Recipe: Pizza Pockets
    Ingredients:
    2 sheets pie crust, store bought or homemade
    1 cup pizza or pasta sauce
    1/2 cup ricotta cheese
    1/2 cup shredded mozzarella cheese
    1/4 cup shredded Parmesan cheese
    3/4 cup chopped mushrooms
    1/4 cup diced green pepper
    1/4 cup diced onion
    1 Tbsp Olive Oil
    1/2 tsp. garlic salt
    salt and pepper to taste
    1 egg
    1 Tbsp Water

    Preheat over to 425 degrees F.

    Saute green peppers in olive oil over medium heat for 2 minutes. Add onions and mushrooms. Continue to cook until vegetables are tender. Add garlic salt, pepper and salt to taste. Set aside.

    Mix mozzarella and Parmesan cheeses in a small bowl. Set aside.

    Roll out pie crusts. Place one sheet on top of the other. Cut crust into desired shape. Make sure the pieces are at least 3 inches in diameter. This will be enough room for the filling.

    Mix egg and water. Set aside.

    Take two matching cut outs and place side to side. Place 1 tsp pizza sauce in the center of one of the pieces. Top with 1/2 tsp ricotta cheese, 1 tsp veggie mix, and 1 tsp cheese mix. Make sure to leave 1/2 in of so clear ring around filling.

    Brush the outside ring of the crust with egg and water mixture. Place matching crust cutout on top. To seal the pieces together, take a fork and press the edges.

    Place each pocket, in a single layer, into a greased baking dish.

    Cut slits into the top of each pocket for venting. If you are making footballs this will help to create that look.

    Brush the tops of each pocket with egg and water mixture.

    Bake in over for 10-12 minutes or until lightly browned.

    Serve with pizza dipping sauce. Enjoy!

    Sunday, February 5, 2012

    Veggie Ricotta Bake

    This was one of the dishes I pulled out of no where. I had a dinner party to go to, actually a going away party. I  had forgotten that I needed to bring something, so I whipped this up. I will do my best to create the correct ingredient portions, but like I said I just threw it together, no measuring necessary.

    Recipe: Veggie Ricotta Bake
    Ingredients:
    Pie crust (use your favorite recipe for pie crust or use 1 sheet of the premade)
    3/4 cup ricotta cheese
    2 cloves garlic, minced
    2 eggs
    salt and pepper to taste
    1/2 tsp basil seasoning or fresh chopped basil
    1/4 cup mayonnaise
    1/4 cup mozzarella cheese, shredded
    1/4 cup cooked whole wheat or regular couscous
    1/2 cup chopped broccoli
    1 chopped tomato
    2 chopped green onions

    Preheat oven to 350 degrees.

    Mix Ricotta, garlic, 1 egg, salt and pepper, basil, mayonnaise, mozzarella, and couscous. Set aside.

    Roll out pie crust. Spread cheese mixture out over the crust, leaving a 1 1/2" ring free of mixture.

    Roll the ring of crust over onto mixture, fold as necessary.

    Sprinkle veggies on top of cheese mixture that is not covered by the crust.

    Mix 1 egg yolk and 1 tbsp water. Spread over visible crust.

    Place in over and back for 25-35 minutes or until edges are golden brown.

    Mini Taco Cups

    I love creative and different appetizers. Here's one that is super easy and can easily be vegetarian or made with meat. I made this last night for a ladies night dinner party at my friend Suzanne's. Thanks Suzanne!

    Recipe: Mini Taco Cups


    Ingredients:
    24 won ton wrappers
    1/2 lb ground meat (I used elk)
    1/2 can low fat re-fried beans
    1/2 package taco seasoning
    1/3 cup water
    1/2 cup shredded cheese, of your choice (I used Mexican blend)
    1/4 cup salsa
    1/2 avocado
    1/4 cup sour cream
    2 Tbsp. chopped cilantro

    Preheat oven to 425 degrees F.

    Cook meat in a medium pan until well browned. Add taco seasoning and water. Mix.

    Add re-fried beans to meat and mix well, set aside.

    Take your won ton wrappers and place them into an ungreased mini muffin pan. Fold each wrapper gently so it makes a cup inside each mini muffin cup.

    Place 1/2-1 Tbsp. of meat mixture into the bottom of each won ton wrapper. Top each cup with a pinch of shredded cheese and a small drop of salsa.

    Place in oven and bake on middle rack for approximately 8 minutes or until edges of won tons are golden brown.

    Meanwhile, place 1/2 an avocado into a small zip-lock bag. Use your had to smash it. Once smashed add sour cream to the bag. Again mix with your had by smashing. Once it is well mixed, cut a small hole in one of the bottom corners of the bag.

    Squeeze a small dollop of avocado mixture onto each taco cup.

    Next place a sprinkle of chopped cilantro on each taco cup.

    Makes 24 appetizers.

    Chocolate Chip Cookie Dough Truffles


    If you haven't noticed yet I have a sweet tooth. I can remember Carah Carlman's basement freezer had cookie dough stocked in it at all times. It was a wonderful afternoon treat. Ah, the days when you could eat whatever and not have to work for it. I caution you, these taste like they need a good workout following their consumption. Be careful, but enjoy every bite!


    Recipe: Chocolate Chip Cookie Dough Truffles
    Ingredients:
    2 1/2 cups all purpose flour
    1 teaspoon salt
    1/4 teaspoon baking soda
    1 cup (2 sticks) butter or margarine, room temperature
    3/4 cup granulated sugar
    3/4 cup packed brown sugar
    1 teaspoon vanilla
    1/3 cup milk or soy milk
    1 cup mini semi-sweet chocolate chips
    14 oz dark chocolate candy coating


    Mix butter and sugars until fluffy. Add vanilla and soymilk. Mix well. Add dry ingredients and mix until combined.
    Fold in chocolate chips.
    Place dough in a covered container into fridge for 1 hr.
    Remove from fridge and roll dough into 1" balls. Place balls onto a cookie sheet lined with parchment paper. Place sheet in freezer for 30 minutes.
    Melt chocolate candy coating according to package directions.
    Remove balls from freezer. Using a fork dip each ball into melted chocolate. Shake any extra chocolate off. Place chocolate covered ball back onto parchment paper or into individual mini muffin liners.
    Keep dough balls chilled and until ready to serve. Enjoy!

    Saturday, February 4, 2012

    Roasted Grape Crostini


    Recipe: Roasted Grape Crostini


    Ingredients:
    1 lb. red grapes, no seeds, stems removed
    1/3 cup blue cheese or goat cheese
    1/4 cup agave nectar
    1 baguette
    2 Tbsp olive oil

    Preheat over to 400 degrees F.

    Place grapes on  baking sheet. Drizzle olive oil over grapes. Place in preheated oven for 25-30min or until grapes are slightly wilted. Remove from oven and allow to cool.

    Meanwhile, slice baguette into 1-2" slices. Once grapes have cooled, place 2-3 grapes on each bread slice.

    Sprinkle each slice with cheese and drizzle agave nectar over each slice.

    Before serving place slices on a baking sheet and warm in the oven for 5 min at 350 degrees F.

    Sunday, January 22, 2012

    Quick and Easy Cinnamon Rolls

    I usually use my mother's recipe for cinnamon rolls, but in my recent move I am not sure where I put my recipe book. Don't worry mother, I know I wrote the recipe in my actual recipe book. I sware I won't be calling you for the 50th time for the recipe. :)

    Anyways, today I went on one of my favorite sites, foodgawker.com , and found a very easy recipe, no yeast, for cinnamon rolls.


    Recipe: Quick and Easy Cinnamon Rolls
    Ingredients:

    For the Dough:
    2 3/4 cups flour
    2 Tbsp sugar
    1 1/4 tsp Baking Powder
    1/2 tsp Baking Soda
    3/4 tsp salt
    1 1/4 cup buttermilk (I used soymilk)
    6 Tbsp. melted butter

    For the Filling:
    2 Tbsp melted butter
    2 Tbsp sugar
    1 Tbsp cinnamon

    For the Glaze:
    1-2 Tbsp water
    3/4 to 1 cup powder sugar

    1. Preheat oven to degrees F
    2. First, mix all of the dry injgredients for the dough. Then add the melted butter and milk. It will initially look like a wet mess. Continue to mix and knead for a couple minutes and it should be a little sticky, but not wet. If it seems too wet add flour.
    3. Once it is mixed and in a ball shape, roll it out into a 12"x9" rectangle. Be sure to flour the surface you are working on and whatever you are using as a rolling pin.
     4. Once it is rolled out, spread the 2 Tbsp melted butter over it. Mix the cinnamon and sugar in a small bowl. Sprinkle mixture over the dough and butter.


    5. Roll the rectangle up. Roll hotdog style.
    6. Now that it is rolled it needs to be cut. The recipe I used gave a great tip. Use dental floss to cut your pieces. Take a piece of floss and slide it under your roll. Find the size you would like (1-2 in) and pull the floss around the top of the roll and continue until it cuts your dough. Perfecto!
     7. Place rolls onto a greased or parchment lined baking sheet. Bake for 15 minutes at 425 degrees F.

     8. While the cinnamon rolls are baking, prepare the glaze. Simply mix powder sugar and water until you reach your desired consistancy for the glaze. I like thicker glazes so I used less water. Drizzle the glaze on your rolls while they are hot.

    For the single person, drizzle the rolls with the glaze and allow to cool. Once they have cooled, place an individual roll in seran wrap and wrap. Place in the freezer and you have breakfast all weel long. Just throw it in a microwave for 30-45 sec and it'll be nice and warm.


    ENJOY!